| The Greatest Fear: Step #2 – Prepare Your Material |
Proper preparation is the best push forward that you can give yourself in your career. Now that you have your outline and the points that you would like to include in your presentation (Step #1), you can prepare your slides using the following tips.
Tip 1: Know Your Tools
“Know your software tool and your audience” — This is the golden rule that determines the guidelines for each presentation that you will give.
 If you are preparing your slides for a weekly business/group review where the audience is concerned with “just the facts,” pertinent information can be shared with simple black and white slides consisting of one line headings and bullets using bold, italics, and underlining formats for differentiation.
If the information to be presented is complicated and difficult to express there are color-coded spider charts, X-Y and bar graphs, Gantt charts and statistical tables, which can be conveniently copied to your slides.
BTW: The use of animation on a slide is fine but make sure you’re VERY familiar with the operation of the feature. Nothing is more distracting to an audience than watching the speaker fumble with misbehaving animated bullets (or butterflies) popping up at inopportune times.
Tip 2: Estimate the #of slides
How many slides should you prepare? It depends on how long you intend to talk. As my former boss said “Well Brauer, the rule is one slide per every two minutes, and after you do a few practice run-throughs, you’ll find out whether it’s too much or too little and you can adjust.” Simple advice that works well. Keep the estimated number of slides in mind as you begin to place information on each slide and remember that extra slides can be held in reserve as a backup for key slides during your Q&A.
Tip 3: Bullets
95% of a slide show should be composed of short and to the point one line bullets. Any longer and the effectiveness of the bullet is lessened. Use key words in your bullets allowing them to act as springboards to your thoughts as you present.
The maximum number of bullets on a slide is six, and sometimes even six may cause the slide to look crowded. Four bullets are optimum. If more than six bullets are needed, then add an additional slide to accommodate the overflow.
Use a space in between each bullet for clarity so that the audience can easily locate your present talking point. If the speaker gets a little long winded on a specific item or piece of data, the bullet is a reference that can be used to bring both the speaker and the audience back to the subject.
Tip 4: “Do’s” & “Don’ts”
“Don’t” express what you want to say in a paragraph and place it on a slide. If, against my suggestion, you feel forced to place a paragraph on a slide, read the whole paragraph to the audience when you present. “Don’t” stay silent expecting the audience to read it to themselves while you wait. And “Don’t” paraphrase it. That only leads to confusion.
The only paragraph suited for a slide is a quote that is to be used to emphasize a core point of the talk, and it should have its own individual slide. “Don’t” forget quotation marks and a reference to the author.
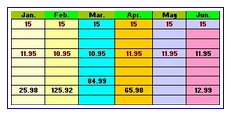
“Don’t” show raw data unless your purpose is to confuse or overwhelm the audience. If there is a compelling reason to use a table of data make sure to color code the important points in the table soExcel that the audience’s eyes are immediately drawn to those colorful summations, and make a remark like “I know that this is a busy slide but let me call your attention to the color-coded information.”
Preferably “Do” use summary statements or graphic representations derived from the data. You know better than anyone else why and how the information that you have gathered is important, so summarize it and share the conclusion with the audience.
“Do” remember not to crowd too many points on one slide. It’s always better to have more slides with less information on each than a few crowded and difficult to read slides.
Additionally, using the color yellow for font or for data differentiation in a graph is a big “Don’t” and the same goes for cyan. Both are difficult for the audience to see. Even if you try to place the yellow font on a dark background the information on the slides will still be difficult to read. Not only does yellow show up poorly on slides when projected on a screen, it also disappears when you make copies of your slides for handouts, with a black and white printer.
“Do” design your slides so that they are easily read from the last row when the front half of the room’s lighting is dimmed.
To summarize: your presentation is a showcase for you as a professional in your field. Following Step #2 allows you to project an image of a well-organized, energetic, meticulous individual, who is an authority on the subject being presented.
Now, on to Step #3: – Practice your message.
Tags: business, business cards, elevator speech, empowerment, empowering women, handshake, networking, networking skills, presentation skills, self improvement, Susan Brauer, visualization, women's networking, Organize data, Prepare material, Practice your message, Project your personal image, Face your Fears | Category: Her Paradigm Shift, empowerment, self, women